Access Control Management with Swift
Access control is a requirement for every app that has different kinds of users or even just implements login functionality, sometimes it is as simple as preventing not-logged-in users from accessing app content at all but there are other situations where things are not as simple as that.
In this article we will dive more into that topic by building an imaginary news app that divides news into groups, when it comes to user management our app has the following requirements:
- Anyone can browse public groups even if he is an anonymous user
- Browsing private groups and posting to them is restricted to group members
- Deleting posts in a group is restricted to group admins only (note that group admin can browse and post to his group as well)
- Super admin can browse, post, or delete posts from any group
To learn ios visit:ios online training
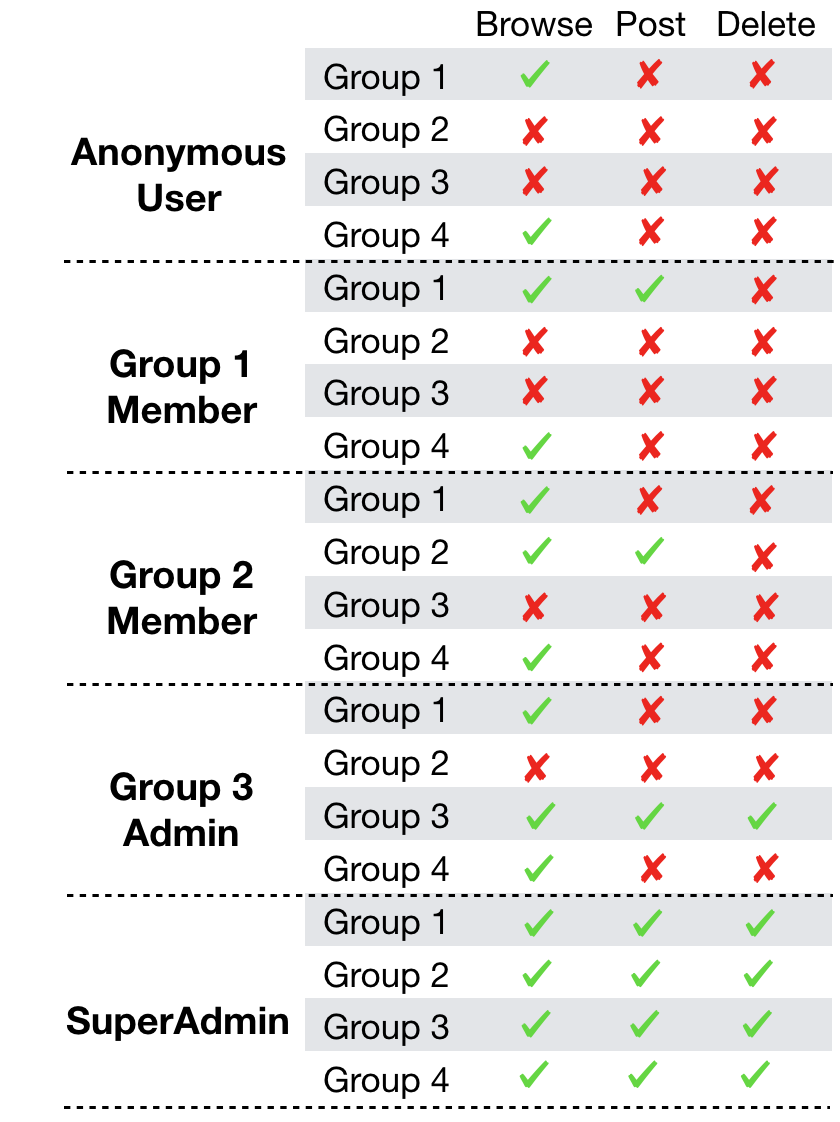
So for example, if we had 4 groups where only Group 1 and Group 4 are public the app should be like this:
Designing for change
One last thing I want to tell you before we start implementing our solution, don’t take the requirements you just read above for granted, in real-world scenarios most probably these requirements will keep changing again and again according to different business needs.
When designing a solution for a problem, it is always a good practice to think about which parts of the problem are eligible for being changed later and how can we make our solution flexible enough to embrace these changes with minimal cost of change.
In our case the solution should be open for adding more rules and actions later, for example we might decide later to allow users to browse a group if it is created for news within a specific distance range from the place the user lives in, or that any group member can send a group invitation to someone but only group admins can approve that invitation.
Authentication and Authorization address two different questions, Authentication means who are you? and Authorization means what are you allowed to do? This article doesn’t talk about authentication
Access Control Management 101
If you heard about access control management before most probably you heard the term ACL (Access Control list), ACL is a list of permissions attached to an object, usually represented as a table of privileges. ACL is not an access control method but it is an implementation type that can be used to implement different access control methods.
Some access control methods focus on the resource being requested like MAC/DAC (Mandatory/Discretionary Access Control), while other methods focus on the identity of the user who made the request like IBAC (Identity Based Access Control) in which each individual is given specific access rights for every operation.
IBAC can be used in simple systems with few users, However as systems grow in user numbers, it usually gets difficult to manage. RBAC (Role Based Access Control) tries to solve the limitations of IBAC by mimicking the real world needs more closely. In RBAC operational privileges are grouped into roles and each user is assigned a role (Think of a role as a group of users that have some common characteristics). The difference between IBAC and RBAC it that the role, instead of the individual, is the basis for access checks.
RBAC is usually implemented as a hierarchy of roles HRBAC (Hierarchical Role Based Access Control) to allows roles to inherit privileges from other roles, which in turn makes it easier to add new operational privileges to the whole tree (GroupAdmin inherits browsing group permission from GroupMember because every group admin is-a group member ).
But what if we want to grant access to members belong to a role who also have specific characteristics (like for example group members who earned a specific badge), using the RBAC we have to create different roles for different users based on these attributes (a set of roles where each role corresponds to a specific badge and all these roles inherits from GroupMember role), which will result in a huge number of roles (role explosion problem). ABAC (Attribute Based Access Control) aims to solve this problem by providing a framework for defining access rights based on the various properties of a user.
That was a quick introduction about basic access management methods, in the rest of this article we will be building a Swift framework that will apply the concepts we talked about to achieve our goal for managing users in our news app.
The Plan
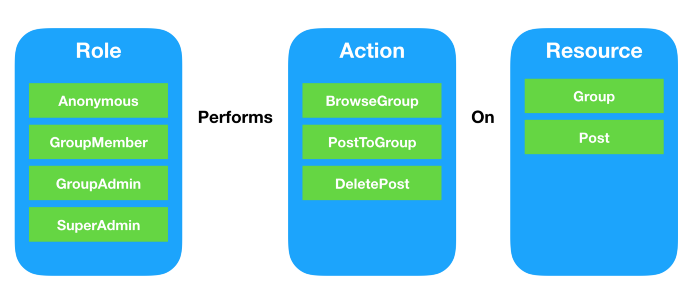
Let’s start by dividing the requirements into three main domains:
- Actors who perform actions (Roles): anonymous users, group members, group admins, super admins
- (Actions) performed by actors: browse group, post to group, delete post
- The (Resources) that actors perform actions on them: groups, posts
Next, we need to form a declarative way (think of it like an equation) to describe the relationship between these three domains in terms of which role should be able to perform action on a resource. For example, group member should be able to browse a group when he is a member of this group.
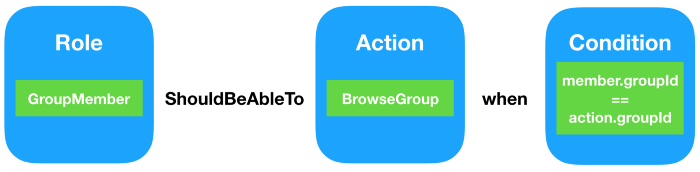
Let’s call this equation a policy, so now we can convert any requirement we have regarding access control into a policy. Some policies doesn’t even need a condition, for example a super admin can browse any group without any limitation; in that case we need to omit the condition as it will always return true.

In the next section will leverage the power of Swift to implement a framework that can:
- Describe and maintain our requirements in form of a set of policies.
- Provide a clean API for other system components to inquiry if a specific user is allowed to do a specific action or not (complying to the policies).
The Execution
Let’s start by writing our solution in pseudo code to give us a clue about what do we want to achieve in Swift:
// The Group member policy GroupMember.shouldBeAbleTo(BrowseGroup) .when(member.groupId == action.groupId) // create users user1 = GroupMember(name = "Adam Smith", age = 18, groupId = 1) user2 = GroupMember(name = "Adam Smith", age = 18, groupId = 2) // create action browseGroup2 = BrowseGroup(groupId = 2) // check if user is allowed user1.can(browseGroup2) // false user2.can(browseGroup2) // true
In our news app, assume that we have a class User that contains basic user information like name and age and a class Group containing basic group information like groupNumber and a flag indicating if group is public or not:
class User
{
var name: String?
var age: Int?
init(name: String, age: Int)
{
self.name = name
self.age = age
}}
struct Group
{
let groupNumber: Int let isPublicGroup: Bool}
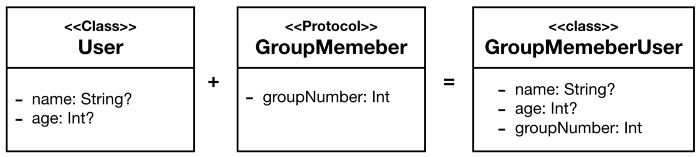
Because Swift Is a Protocol-Oriented Programming Language, we will use the power of Protocols and Protocol extensions to build our solution. We will compose roles to users by mapping our roles to protocols and mix these protocols with User class to generate different types of users based on their roles. For example a User class conforming to GroupMember protocol is a GroupMemberUser and must have property groupNumber .
Now taking role hierarchy into consideration we will model all roles as protocols. For example GroupAdmin extended GroupMember because every GroupAdmin is-a GroupMember, this means that a group admin have all the privileges group member had plus more.
protocol Role { }
protocol Anonymous: Role { }
protocol GroupMember: Role
{
var groupNumber: Int {set get}}
protocol GroupAdmin: GroupMember { }
// every GroupAdmin is-a GroupMemberprotocol SuperAdmin: Role { }
Next step is modeling actions, mapping different actions to simple types (in our case I choose struct) that conforms to protocol Action
protocol Action { }
struct BrowseGroup: Action
{
let group: Group
}
struct PostToGroup: Action
{
let group: Group
}struct DeleteGroup: Action
{ let group: Group
}
Next piece in the puzzle is the one that manages the relationship between actions and roles, the Policies. Remember from the previous section that Policy = Role + Action + Condition. Policy has two important methods, apply which executes condition on an action and a role instances and when which accepts a condition because condition is optional and not included in the policy initializer.
public class Policy
{
let action: Action
let role: Role
var condition: ((Role, Action) -> Bool)?
init(action: Action, role: Role)
{
self.action = action
self.role = role
}
func apply(role: Role, action: Action) -> Bool
{ return condition?(role, action) ?? false
}
public func when(condition: @escaping (Role, Action) -> Bool)
{
self.condition = condition }}
Connecting the dots
In order for our solution to be more like the pseudo code we started with, we will change Role and Action protocols to be like this:
internal var rules = [Policy]()
public protocol Action { init() static var action: Action.Type { get }}
public extension Action { static var action: Action.Type { return Self.self }}
public protocol Role { init() static func shouldBeAbleTo (_ action: Action.Type) -> Policy func can (_ action: Action) -> Bool}
public extension Role { static func shouldBeAbleTo(_ action: Action.Type) -> Policy { let rule = Policy(action: action.init(), role: self.init()) rule.condition = { role, action in guard role is Self else { return false } return true } rules.append(rule) return rule } func can (_ action: Action) -> Bool { return rules.reduce(false) { $1.apply(role: self, action: action) || $0 } }}
Here we added shouldBeAbleTo function to Role protocol, this function acts as a factory method that creates a policy connecting an Action to the caller Role, we can then assign additional condition to this policy using the when function we added before in Policy class. We also added the function can which validates if the role can perform an action by evaluating this action over all rules and return true if anyone of them returned true. Note that we also added a required empty initializer to both protocols.
Everything is in place now, we can now feed our framework with all the policies we had in the requirements and build our app
GroupAdminUser.shouldBeAbleTo(DeleteGroup.action).when { guard let groupAdmin = $0 as? GroupAdminUser, let deleteAction = $1 as? DeleteGroup else { return false } return groupAdmin.groupNumber == deleteAction.group.groupNumber}
GroupMemberUser.shouldBeAbleTo(BrowseGroup.action).when { guard let groupMember = $0 as? GroupMember, let browseAction = $1 as? BrowseGroup else { return false } return groupMember.groupNumber == browseAction.group.groupNumber}
AnonymousUser.shouldBeAbleTo(BrowseGroup.action).when { guard let browseAction = $1 as? BrowseGroup else { return false } return browseAction.group.isPublicGroup}
_ = SuperAdminUser.shouldBeAbleTo(BrowseGroup.action)_ = SuperAdminUser.shouldBeAbleTo(PostToGroup.action)_ = SuperAdminUser.shouldBeAbleTo(DeleteGroup.action)
This implementation allows us to add new policies with the minimum cost of change as we discussed before.
User.shouldBeAbleTo(BrowseGroup.action).when {
guard let user = $0 as? User,
let browseAction = $1 as? BrowseGroup else { return false }
return distanceBetween(user.locaion, browseAction.group.location) < 30
}
Conclusion
In this article we implemented a simple attributed role based access control framework in Swift. Our solution used the power of swift protocols to allow us to model the requirements we had in form of a set of policies.
To more information visit OnlineITguru's ios app development course


Comments
Post a Comment